Showing posts with label Recipes. Show all posts

Wednesday, March 13, 2013

Pinterest success and failures take 2

Well I have complied a list of my recent Pinterest adventures and what kind of results I had. Check them out below. I would love to get some input on Pinterest Pins you would like to see me attempt. So if you are already a member of my group "See Kristin Attempt This" please start pinning things you would like for me to try. If you are not and would like to let me know!

A little something for the kids: Small Town Driving Mats
I printed these two pages out and whipped out my laminator (man I love using that thing!) The kid loved having something new to drive his "Little People" car and "Hot Wheels" cars on. I have decided though, I think I need two more and some Velcro to attach them and then it will be magnificent!

 
S'mores Dip - yep you read that right!


This recipe is perfect!  My hubs and I ate half of the bowl of it in one sitting - probably not so good.


Homemade creamer!


This recipe is great.  But let me give you two tips.  You don't have to add the vanilla.  If you use syrups with your coffee for different flavors you won't want it and then it will be more versatile.  Second, save a decent plastic creamer container from the store and make it and store it in that.  We did the jar and it was difficult to pour without making a mess.  Plus then you reuse!  Definitely a keeper and cheaper than store bought!


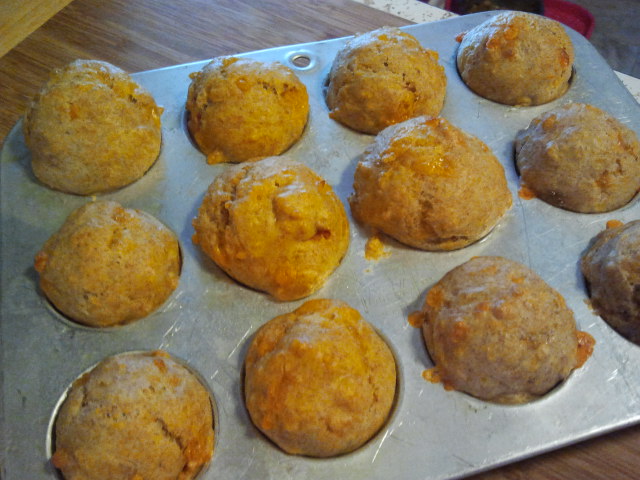
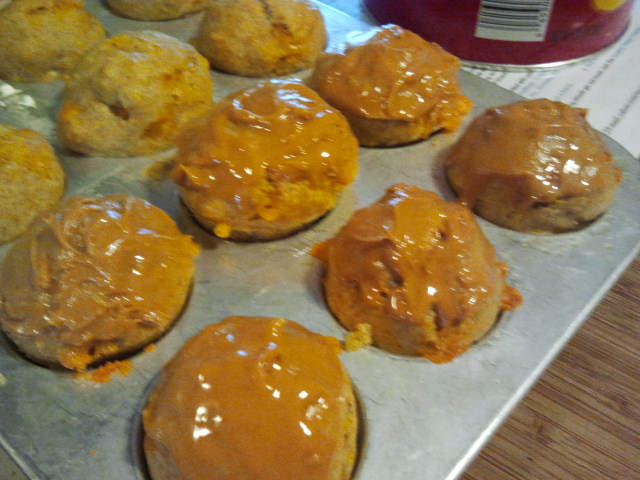
Personalized Baked Oatmeal Cups - eh.

Well these had such promise but tasted pretty blah.  I even ramped up the sugar content but they were just so dense and flavorless to us.  In order to eat the 2 dozen that I made we topped them with Ready Whip and that helped.  I made them in butterscotch chip, chocolate chip, raisin, and blueberry.  Butterscotch was the best by far.  I don't think we will make these again, the 1 1/2 year old would not touch them and that was sort of the point - easy go to breakfasts.


Homemade deodorizers - not so easy.

So I made this up in no time and let them dry for the 24 hrs.  I did not have a silicone pan so I used a mini muffin pan as suggest.  Yeah, those suckers were not coming out whole.  When I tried to "pop" them out with a knife, they just started to crumble.  I was a tad upset as I am cheap and ended up throwing it all away - oh the wasted time, money, and resources!  I might give it another try if I get my hands on the right sort of pan.  I really wanted them for my son's cloth diaper pail that smell worse than death. 

DIY Dishwasher detergent - Maybe there is hope?

This worked...sort of.  Most of the dishes were clean but a few still had some gunk.  However, the inside of the dishwasher has never looked cleaner.  May have to give it another try with a shot of vinegar in the rinse spout.


Dr. Bonner's Sal Suds in the Dishwasher - Not so hot in ours!

This was very watery as you can imagine a solution of Sal Suds, water,  lemon juice, tea tree oil, and
white vinegar would be.  Most of the dishes were clean but not as clean as a commercial detergent would clean them.  I am starting to wonder if my dishwasher is more the problem.  But none the less this one did not work for me.

Okay so there is another round of Pinterest success and failures.  If you want to see another round give this post a like and follow/Pin to my board on Pinterest.
See Kristin Attempt This - Pin items for Kristin to try out and blog about!

Today, choose Love.
Kristin

Pin It

Saturday, March 9, 2013

Ohh - I got to guest blog on a great food blog! Everyday Mom's Meals: Weekend Company {Guest Blogger Kristin}

I was so excited when my good friend and blogging mentor asked me to be a guest blogger!  Please check it out and her blog.  She makes so many yummy family meals!

Everyday Mom's Meals: Weekend Company {Guest Blogger Kristin}: Good Morning! I'm so excited for today's guest! She is a fellow mommy, blogger and just a terrific person. It's funny because Kr...


Pin It

Saturday, February 2, 2013

Stretching Chili Style

So if you are a little bit crazy like me you did a year end evaluation of your finances (yes, I am a big nerd and yes, I do know how to have a good time) and nearly passed out.  Let's face it the price of everything is going up - gas, toilet paper, bananas, and milk - I am strongly considering buying the cow (nobody is giving the milk for free these days!) but I am pretty sure that might be a little costly too.  So what do you do when you see your income versus spending is not getting along in a way that keeps the heartburn beast at bay?  You gotta find ways to stretch those precious dollars.  So in honor of short funds I give you "stretching it chili style"!
 
 
Here is a list of ingredients you will need for all of the meals.
 
2 Qt of Tomato juice
3/4 cup of dried onions
2 cans of medium chili beans
1 can of diced tomatoes with green chilies
1 can of tomato paste
1 to 1 1/2 lbs of ground beef (turkey, etc)
1 1/2 cup of Orzo pasta
8" flour tortillas
2-4 cups of cheddar cheese
2-4 tsp of ground black pepper
4-6 tsp chili powder
2 tsp chipotle chili powder (if you cannot find this use a little more chili powder)
1 tsp of Cumin
1 tsp of granulated garlic
 
other extras you might want:
Diced onions
Crushed tortilla chips
Sour cream
Real bacon bits or crumbles
 
 
Here is just a tip - when trying to get something like tomato paste out of the can - use a very small rubber spatula and you will be able to get every bit - see!
Penny pincher's delight!
 
Okay so you brown the ground beef (or other) and when it is only about half pink add in the dried onions.  I don't know why but for chili I really prefer the dried but if it kills you to use dried you will probably want to use a finely diced medium onion.
 
Once the meat is fully browned and the onions rehydrate add the (don't drain anything) 2 cans of chili beans, diced tomatoes, tomato paste, 1 qt worth (4 cups) of the tomato juice, and spices. 
Okay I have to be honest.  I do not measure spices really at all.  I do everything to taste and it also depends on the heat level appropriate for the diners you will be serving.  Thus I give you a range.  I "measure" like good ol' Rachael Ray, by using my hand or sight.
 
 About a good tsp!
Simmer for 25-30 minutes and taste for seasoning.  Enjoy as is or top with cheddar cheese (I suppose you could add crackers but then you are just ruining it). 
 
Ah the first finished dish - Kristin's Chili
Okay after you have enjoyed as much as you like of the chili take a slotted spoon and put about 2-3 cups in one container and the rest in another.
 
Next up we add 2-3 cups of the left over tomato juice and 1 1/2 cups of Orzo pasta to the larger portion of leftover chili.  Now I know most of you probably grew up like my hubs with chili containing macaroni and I am sure that is fine.  The thing is I had orzo on hand and thought it would not over power the chili and I was SO right!  We loved the texture.  But if you cannot bear to see another pasta be my guest and change it to another small cut pasta of your liking. 
You may have to adjust seasonings after the pasta is done cooking which will take about 15-20 minutes. (If you were smart and own a pot that can go from the stove to the fridge and back again you saved your self a washing and stored the large portion in the pot you made it and then just added these ingredients).  Top with a little cheese, maybe sour cream, and tortilla chips - dress it up anyway you like! - and if it stretches another meal - try it topped another way!
Orzo Chili
 
Next break out the tortillas and the strained chili.  Heat up that chili, warm your tortillas, top with cheese and whatever else your heart desires!
Delicious Chili Cheese Burritos
 
Now I know you are saying, "But Kristin I still have some stuff left over."  No problem.  Enjoy the leftovers or slap whatever is left in a tortilla with cheese and fold it in half.  Toast in a pan on each side-  chili cheese quesadilla!  Now take that left over tomato juice and make yourself a  Bloody Mary because you just stretched a one pot meals to the extreme!
 
 
If you have a great stretch it meal or an idea for another way stretch this chili please feel free to share!
 
Pin It


Tuesday, January 29, 2013

A Fur Baby Birthday Party

Today's blog is for all my dog lovin' people out there!  January 28th is always a bittersweet day for me.  It is my sweet Gracie's birthday and this year she turns 10! We rescued each other on November 19, 2003. It was love at first sight!
I was living in Muncie, IN and needed a companion.  I needed a dog.  I spent most of my life with a dog and living all alone was hard but without a dog seemed down right depressing.  I had searched all of the local shelters but none of them felt like my soul mate.  I was ready to give up until my mom called me at work and said she had found my dog at my hometown shelter and I needed to come home that day and see her.  I did and we both knew right away.  She was 10 months old and just skin and bones.  The picture to the above makes her look pretty good but she was pretty sad.  She had been kept outside, tied to a deck with a 6 foot rope.  She didn't know how to play, she was unsure of being inside, and she did not understand love.  I spent all of my non-working time with her just sitting on the floor loving on her.  She began to trust me and love me.  And I fell so deeply in love with her.  She has been there through everything.  (Like in the picture to the below.  I had broken my wrist on New Years Day 2010.  She didn't want to leave my side.)
Those who love dogs like I love dogs, you know how unconditional their love is.  How deeply they understand your pain, sickness, and love. 
I am going to admit something many will think is crazy.  I was so worried before my son was born that I would either not love my child like I did my dog, or that I would not be able to give my Gracie the love she deserved.  Thankfully, I do love my son so very much and get plenty of good cuddles with my girl.  There are days I feel like she is looking at me like, "Lady, why did you ever bring that crazy, noisy thing in here?"  But I also know she is very protective of him and loves him too.  And he adores her.  He looks for her first thing when he wakes up!
So bittersweet another birthday, because I know these angels are called home much too soon for my heart.  Every year we celebrate because she is just as special as any other member of the family.  But every year I cry a little bit more knowing our days together are getting fewer and fewer. 
She may not be born from my body, or even a human being, but she is my first baby and she always will be.  So today my son and I made her doggie cupcakes and we sang Happy Birthday to her at least half a million times! 

10 years old today and that kid makes me feel all of it!


Doggie Cupcakes without "icing"


Are you sure that is for me?

Adapted from an e-mail from DogAge® Tip of the Week

Cheesy Carrot Cupcakes - 12 mini cupcakes
1/2 cup all-purpose flour
1/2 cup whole-wheat flour
1/2 tablespoon baking powder
3/4 cup grated Cheddar cheese
1/4 cup grated carrot
1 large eggs
1/2 cup milk
1/8 cup vegetable oil
Peanut butter or plain yogurt to "ice" them

Preheat the oven to 350 degrees. Grease a muffin tin or line it with paper baking cups. I like mini cupcakes but if you wanted to double the recipe you can do 12 regular cupcakes.

Combine all of the ingredients just until moistened.
Fill the cups full with the mixture. Bake for 20 to 25 minutes, or until the muffins feel springy. Be sure to let the muffins cool about 5 minutes and then "ice" them.  Let them cool completely before serving to your sweet fur baby!

        Recipe from: DOGS: The Ultimate Care Guide, edited by Matthew Hoffman.

So do something a little special for your furry friend for my Gracie!
 
Pin It
 

Saturday, January 12, 2013

Did I hear the word "Muffins"?

So I never used to eat breakfast at breakfast.  I was the kid - into adulthood who lived through the morning on nothing but liquids.  My mom would get some nutrition in me with good ol' Carnation Instant Breakfast.  Every great once in awhile I would eat more - if donuts or some other sweet treat was involved.  Then even into my early twenties I would have a yogurt smoothie and coffee.  Don't get me wrong I LOVE breakfast foods.  I just hated to eat in the early a.m.   This all changed when I learned how blood sugar dips and without a steady supply of healthy food energy you get that "crash" feeling and then you eat more than you would and chances are worse than you would have -if only you would have had breakfast.  I became a breakfast fanatic!  I love trying out new healthy recipes for breakfast and all the better if they stretch for several breakfasts!  So today I bring you a combo post of Pinterest success and what came out of it - a recipe of mine.

See I took this woman's idea of a base recipe and then came up with this amazing muffin recipe that my son cannot get enough of and my husband asked to share at a work meeting!

Her basic Muffin Mix is a great way to start experimenting with ingredients.  I did a first version that was pretty good with apples and cinnamon but these are what I would like to think of as coffeehouse good!

Banana Oatmeal Chocolate Chip Muffins

For 2 dozen
Preheat oven to 400 and spray muffin tins with non stick flour spray.

2 cups of whole wheat flour
2 cups of quick cooking oatmeal
2 Tbsp of baking powder
scant 1/2 tsp of salt
1 cup of skim milk
1 cup of vanilla Greek yogurt
2 eggs
1/3 cup of applesauce
1/3 cup of vegetable oil
2-3 mashed bananas
2 cups of semi-sweet chocolate chips
2/3 cup of packed brown sugar
1 Tbsp of honey

Mix dry, add wet, add the rest. Mix until just moistened. Fill muffin cups nearly full.
Sprinkle with brown sugar. (This gives it a great slightly sweet crunchy top!)
Bake for 18 minutes.
Let cool for at least 5 minutes.
Enjoy!
If you wanted to go healthier (sad for you - just kidding - I should be healthier too!) you could substitute raisins for the chocolate chips, egg substitute for the eggs, and Splenda for the brown sugar.


Pin It

Monday, January 7, 2013

Pinterest successes and maybe a little failure


Okay by now you have probably figured out that I am fairly obsessed with Pinterest.  I probably spend way too much time pinning things I will more than likely never do but hey we can all dream right? Well today in honor of the fact that my kid is sleeping like it is only a suggestion, I thought I would share a few easy recipes and other items you can do with little to no sleep with success!

Okay, lets get this out of the way.  Yes, I give my kid sugar.  Yes, I give him sugar at breakfast sometimes.  I enjoyed sugar as a kid and grew up fine.  Moderation is the key with anything in life and we should all get to enjoy sweets now and then!  Phew I feel better. On with the show! 

Cinnamon Roll Waffles rock my face off!

    So here is how mine turned out:
So good I could lick my monitor a little! They are crispy on the outside but not hard like they are from the oven, and so soft and good on the inside!  I obviously put 4 in at time because I used the generic original ones.
 
And here is my son enjoying them! He ate two of the four!
 
Next up Quinoa! Okay if you are like me you were saying, "what is this quin-oo-wa stuff and why do I want to eat it?"  Well first let me help you with how it is said, because it took me forever to get it right.  It is pronounced "keen-wah"  and it is stupid easy to work with and delicious.  With that said be careful when measuring and pouring - these little suckers want to run everywhere and if you spill them you will be finding them for potentially years.
So I thought I would start out simple and found this recipe on Pinterest (have I mentioned my love affair yet) but adapted it just a smidge.


Cheesy Broccoli Quinoa - adapted from Mom What's for Dinner

1 cup quinoa, well rinsed
2 cups chicken broth
2 1/2 cups fresh broccoli, chopped
2 cups  shredded cheddar cheese

Add quinoa, broth and broccoli to a large pot.
Bring it to a boil, then reduce the heat and let it simmer for about 20 minutes or until the quinoa is tender (tiny taste test).  Add the cheese - in my world I do not ever measure cheese - I add until I am happy about the cheesiness! Let it melt into the other goodness and enjoy!


The hubs was very skeptical about quinoa but liked this so much he finished what was left in the pot!  Just think of the possibilities with this recipe!  I am thinking next time quinoa, diced onions, and chicken broth - then add diced Italian style tomatoes and mozzarella (by the way I was so sure there was a "t" in mozzarella - dang it spelling is hard!).


Okay and for one non food item - DIY bows


Source: bhg.com via Kristin on Pinterest

Used this to make a nice bow for my Christmas wreath and it turned out great! I used pens instead of dowels - on hand - no cost!!!
Finished product:
And just for fun one Pinterest item I tried and failed.
I made this and it was not addicting and the caramel topping got really watery and pretty gross. This was what someone else said,  "Also known as Apple Crack Dip because it's THAT addicting!"  It was however, not too shabby when I went at it with the immersion blender and then it was pretty decent but looked NOTHING like this!


So that is a little taste of my Pinterest trials.
Please post your Pinterest success and failures!
Oh and if you have any good quinoa recipes please share with the class!


Pin It